Friday, May 27, 2016

DIY Spontaneous Rain-barrel Pond!

It seems like a few things came together just right and I had a fun project idea, with all the supplies on hand. I've been wanting to do a few things and decided to smash them together into one awesome project! The rain-barrel pond!

Last year I bought two short and flat-backed rain-barrels from a garage sale for $15.00, I've been waiting to use them somewhere ever since. So, the other day, I was looking at the side of my shed beside my planters - and thought "will one of them fit there?". I had already created a level base from old bricks, almost like a patio. The bricks were high enough off the ground for a hose to be attached to the bottom of the rain-barrel, so that issue was solved. Because the rain barrel has a flat back, it fir perfectly against the shed wall and does not impede my path to the side of the shed or chicken door, it's the best location. Another bonus and one to be seriously considered is the amount of sun hitting the barrel, thankfully it's in some light shade, sheltered all day. Goldfish are best suited to cooler more comfortable temperatures, I wouldn't want the "pond" exposed to the hot sun, cooking the fish all day.


To set up the rain-barrel pond you need to make sure it's on a level surface and in a stable position. Make sure you use a barrel that is designed and suited for holding water, bins and rubbermaid material is not designed to withstand the pressure of holding water longterm and you could have a problem months down the road with cracking and integrity. My rain-barrels already came with a shut-off spigot and I plan on using water fairly often by simply dunking a watering can or using the hose several times a week. This acts as both a watering device - but also a method of doing water changes for the health of the fish. The top of the barrel is open and I'm not worried about mosquitos, any larvae will be eaten by the fish.

For the inside of the barrel, I made a small "Jenga" like tower of bricks (made sure it's strudy) and filled the base of the barrel with some small rinsed stones. On top of the bricks I placed a bigger piece of flagstone to act as both a shelf for pond plants and as a shelter for the fish. The fish like to go under the flagstone when they see a shadow, this will protect them from predators, and the hot sun if it ever reaches the barrel. Alternatively, the flagstone will act as a heat sink at night and add some warmth. I placed a potted mini lily-pad on the shelf and bought two floating hyacinth, not only are they interesting to look at, they also protect the fish and help clean the water from the toxins created by the fish waste. Using and re-filling the water will also help maintain the water quality.


Supplies you'll need:

wide-mouthed rain barrel
spigot with shut-off
bricks
small stones
1 piece of flagstone
pond plants
small/short hose
1 doz feeder goldfish
goldfish food

In the end, this is an experiment, will this work out? I hope so! I might make some adjustments and add some things, otherwise, it's up and running and let's see what happens!

Thursday, May 26, 2016

New Perennial Fruit Plants May 2016

I've been busy in May! Working my butt off to get all the micro-farm chores done and prepped for our growing season. I do feel a bit behind, but in actuality I've made so much progress on top of the usual maintenance. Aside from all my edible garden space, I have an extensive perennial garden of both full sun and shade areas. I also have a cactus garden, shrubs and trees and grass to maintain throughout the season. In the past, the vegetable gardens have taken priority and received the bulk of my attention, thing is, they were the easiest thing to take care of.

This year I told myself I'd give a bit more care and grunt work towards my perennials and some more neglected areas of garden - and as a reward I'd invest in a few neat projects and add some more perennial fruit. Fruit picking takes me straight back to my childhood in Annapolis Valley Nova-Scotia.
I've always been inspired by Martha Stewart's amazing
high bush blueberry patch and arbor

On May 15th I bought 2 massive high bush blueberries from Terra Greenhouses in Milton, ON, full of blooms and first forming fruit, and at least 4.5ft tall. The inspiration behind the perennial fruit overhaul in the yard. I have had blueberry bushes in the past, but one hot summer they didn't make it. I have two remaining twig-like blueberries left that I'm hoping will take off once moved into a permanent blueberry location.

Look at all those blossoms! Hopefully I get at least a few quarts

Yesterday I bought some smaller bush blueberries from a President's Choice garden centre in town. I've said it before and I'll say it again - I love what they are selling over at PC (Lowblaws, Zehrs, etc). Perhaps a touch expensive, but they have great quality and they have some very unique plant introductions each year, some non-chain garden centres don't even have some of the unique plants PC carries. I'm not sponsored by PC - but if they want to hook a girl up, I'd be happy to try out all of they're stuff - especially the fun edibles! Maybe it was the packaging that drew me in, but wow I got some fun stuff!

Neat how they made the packaging with little labels you can cut out - I probably wont use the labels, but it's a cool idea.
The first thing I found was this funky unique-strawberry 3 pack. The packaging was clever and the varieties are super cool. There is "Heritage" an alpine/wild-like strawberry, seems to have longer wispy growth. "Pineberry" which is an increasingly popular berry, small, white and very sweet, almost tropical fruit-like, I already have a few "White Soul" strawberries and they are great, so I'm looking forward to comparing them. Last-off we've got "Framberry", apparently it tastes like a raspberry cross, it has very compact foliage and shorter growth. Excited to see what comes of this trio, might have to go back and get 2-3 more 3-packs! I think they need they're own space too because my traditional standard strawberries will probably choke them out and smother them with their size. My "White Soul" berries have their own dedicated pot - maybe I need a mini strawberry varieties raised bed? One upside to these smaller berries is that I find they are less predated then the juicy big berries from market varieties.


I also picked up two blueberry plants "Blueberry Glaze" and "Pink Popcorn". They are dwarfs in comparison to my recent Terra bushes, but overall it's a nice variety. Again I might have to make additional raised beds specifically if the high-bush varieties look bizarre beside the smaller bushier plants. I'm interested in a few other varieties like "Jelly Bean" which are larger fruit on a compact plant, "Peach Sorbet" which turns bright red and peach come fall, "Pink Icing" with pink tipped foliage and "Perpetua" a double crop mid-bush blueberry. Hell- if I had the funds, I'd have a row of 6 of each variety. If you really want your own fresh fruit, that's the way to go. One day, and I'll show you how I did it!

"Blueberry Glaze" a small compact variety with dark coloured fruit.
"Pink Popcorn" Blueberry - excited to see how this turns out
I have lumber ready to make some low 2x8ft raised beds of 4x4 posts for the blueberries and another for my gold raspberries. If the design works well, I plan on expanding for more fruit. I need to find some pine needles and I am getting a load of mulch in the next two weeks, things might actually look presentable (to my standard).
Examples of the fruit on each
More updates to come, we've got a rainy-stormy weekend ahead, so I'll actually be able to catch up on some indoor non-garden work and plan some blog posts. I'd like to thank thunderous downpours for the opportunity to force me inside for this post. Stay tuned for my rather spontaneous rain-barrel pond project post!

Friday, May 20, 2016

Baby bunnies are here!

Finally they're here! After a long wait and doubts about her being pregnant at all, momma rabbit surprised me May 18th with 9 baby bunnies! I had to double and triple check that number because that's a massive litter for such a small bunny!


Lots of interesting colours in this litter, I'm super excited to see how they turn out! You can see this kit from the picture above is kind of a lilac colour with a white muzzle and blaze. This "dutch" colour pattern is going to appear among the kits because the buck was a Vienna Dutch Lionhead cross. There are already one or two kits with black and white markings.

Buck sire, similar to this rabbit pictured here.


Such a crazy surprise to fill up water, hay and feed the night before with zero indications of the litter to come that night, and bam! - I came in the next morning to this! She plucked lots of hair too, they certainly have enough to keep safe and warm.


I love this picture because that one kit at the top looks like a little piglet,
so cute and naked, can't wait for more hair!
I've been taking pictures each day, and I look forward to reflecting back when they're all grown and I can see how fast they grew. I know it's going to be fast, but the anticipation of them growing into that cute fluff stage feels like forever.

Vienna Dutch Lionhead/Cross X Vienna Harlequinized Siamese Sable Lionhead/Cross

What colours will they turn out to be?

DIY: Upside-down floral tomato planter

Ive've been wanting to make a spherical hanging planter for a while, and when I found some coco fibre and metal hangers at the dollar store for 2$ I had what I needed. My concept quickly evolved into a floral upside down tomato sphere - why not!

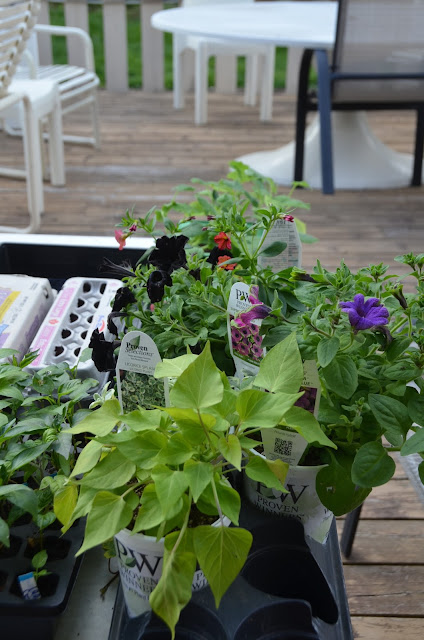
I picked up some "Proven Winners" from Jade Gardens on my annual greenhouse hop, should be an interesting mix of colour. I think anything that can thrive in a hanging basket will do well here. I'm not trying to promo Proven Winners, but they do have some very interesting new varieties of superbells, petunia, petunia hybrids and foliage plants this year. I know that more planters and hanging basket design convention would tell you; thrill, fill and spill, but for a sphere you want mostly fill and spill - who likes rules anyways.


Supplies you'll need:
2 wire hanging baskets with chains and hooks
coco fibre or fibre hanging basket liners (my baskets came with some)
moisture locking soil and or compost
"zip" ties or electrical ties (try to match the colour of your basket wires)
serrated knife
plants


Getting started you'll need two identical hanging baskets with coco fibre liners, thin enough to cut through later. My baskets came with chain and hooks for hanging. I spaced one of the chains to support "the top" basket upside-down, save the other chain for extra support or to lengthen the chain.


Fill the halves with a moisture locking soil or compost, I used a bit of recycled planter soil with moisture lock and compost from my garden, moisture in the case is more important then weight. Wet both sides so that the soil stays in place when you bring the halves together.


Sandwich both sides together, leave one side on top of the other, go around the edge to make sure the coco fibre is sealed around the edges. If they are not sealed, soil will spill out each time you water.


Go around the edges and attach the zip-ties, I used one every few inches, putting lots and lots around the outside isn't super necessary, but it is the support for the bottom half. Luckily I was able to clip the hanging chains around both the top and bottom wire halves for extra strength. Leave the zip-ties long - trust me!


Hang up your new sphere planter and check for weaknesses. I left the zip-tie ends long so that up against a wall or corner like mine (shown above) they act as a guard against the planter swinging around and hitting the wall. Like any planter, you need to think about placement, a round planter once established cannot be placed on the ground in the event of strong winds and stormy weather. Consider anchoring the base with chain or string to the ground to stabilize it if needed. I left the back long zip-ties on and cut away the others just before planting.

Imagine your plant placement before you start cutting holes, you don't want extra drainage as the coco fibre is porous as is. Take a serrated knife and cut a slot for your first plant. Do not remove any coco fibre, leaving a slot will help support each plant and keep the soil and roots inside. When putting your plant in shake off any extra dirt and break up the roots a bit, this will help you fit the plant ion the slot. I added all my plants as the ball was hanging to avoid crushing plants on one side. Be mind-full and leave the back side or "side most likely to be abused" free of delicate plants. Your tomato should go directly at the bottom, only make a small slit and carefully place it as far into the space as it will go.  I placed one plant right at the top and the majority of the plants around the equator, creeping and spilling plants on the bottom half. I placed the ivy near the bottom and I hope to see it trail down almost to the ground, I could also train them up the chain. Above I have a hummingbird feeder, I can't wait for it to fill in!

Tips & Things I would do to improve:

1) Use smaller annual plants - from 6 pack cells or 3" pots, this will make it easier to fit plants inside the coco fibre and do less damage to the plant it's self. I used larger plants and struggled to "gently" add plants to the slots I made. I would also get more plants for a fuller look.

2) Use heavy duty zip-ties. My medium sized ones seem to be fine, but I think larger ones (and in black to match the frame) would stand up just a bit more.

3) I should have bought more hanging baskets! I loved this DIY and now I have so many ideas, like a tomato herb sphere, strawberries, perennial sphere and more! I think I need to go out looking for more! Ouuu! What about a butterfly ball!


 Plants Used:

Petunia Picasso "Blue" Petunia Hybrid
Petunia Picasso "Pretty Much Picasso" Petunia Hybrid
Petunia "Phantom"
Superbells "Dreamsicle"
Superbells "Coralberry Punch"
Lime Green Sweet Potato Vine
Variegated Ivy
Variegated Licorice Plant
Tomato "Variegated"

Total DIY Cost:

Hanging Baskets with Liners - 4$
Zip-ties - 1$
Soil - Free
Plants - 10$

Total: 15$
20 mins to make it yourself
(Plus the wire hanging baskets can be used again next year)